ReactNative jsbundle管理

上一篇文章中介绍了 RN(ReactNative) 自动设置 development server IP 的方法。
这在开发过程中方便了不少,然而我在想能否更加方便一些呢。首先我们知道在开发 RN 应用时,jsbundle 有两种加载方式。
第一种是指定 url 通过网络进行加载;第二种是 pre-bundled 将 jsbundle 文件打包进 app 安装包中。
编译生成的安装包有 Debug 和 Release 两种模式,在 Debug 模式下默认是使用第一种方式加载 jsbundle,在 Release 模式下默认是使用第二种方式。

现在我的需求是编译生成三种模式的安装包:Debug、Release 和 Stage。前两种跟之前一样,
而 Stage 模式下是使用第二种方式加载 jsbundle, 但是生成的 jsbundle 是 DEV 状态下的。
这样在开发过程中给他人安装app进行测试时就不需要反复的修改配置了。

修改 Android 的配置

对于的 android 的配置比较简单。只需修改 android/app/build.gradle 文件,新添加一个 buildTypes 即可。

apply from: "react.gradle" 之前添加如下内容:

1
2
3
4
project.ext.react = [
bundleInStage: true
]

然后再修改配置如下:

1
2
3
4
5
6
7
8
9
10
11
12
13
14
15
16
17
18
19
20
android {
buildTypes {
debug {
applicationIdSuffix ".debug"
resValue 'string', 'app_name', '"XXXX(Debug)"'
......
}
release {
minifyEnabled enableProguardInReleaseBuilds
proguardFiles getDefaultProguardFile("proguard-android.txt"), "proguard-rules.pro"
resValue 'string', 'app_name', '"XXXX"'
......
}
stage {
initWith(buildTypes.debug)
applicationIdSuffix ".stage"
resValue 'string', 'app_name', '"XXXX(Stage)"'
}
}
}

这里添加了一个 stage buildTypes 继承至 debug。并且为了能够同时安装不同模式下的app,这里设置了不同模式 bundleID 的后缀。
同时还设置了不同模式下app的名称,以便区分。

然后进行 android 目录下执行 ./gradlew assemble 命令,即可在 android/app/build/outputs/apk 目录生成 app-debug.apk、app-release.apk 和 app-stage.apk 三个 apk 包。

修改 iOS 的配置

首先将 Debug Configuration 复制为 Stage
Xcode-configuration

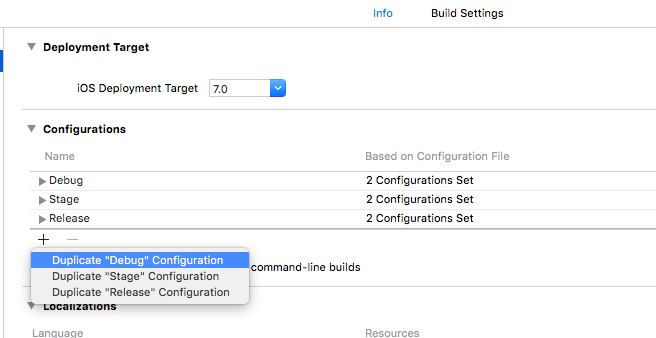
然后进入 Build Settings 修改 Preprocessor Macros,对 Stage 添加一项配置: STAGE=1
Xcode-buildSettings

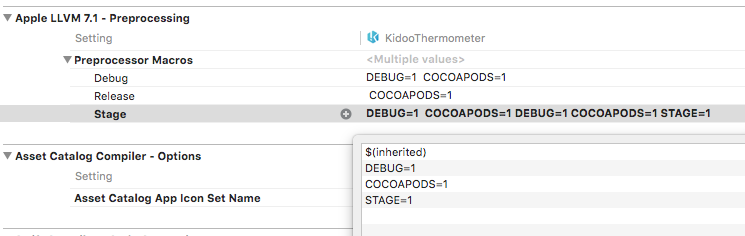
然后再编辑 AppDelegate.m 文件,修改 jsCodeLocation 相关配置。

1
2
3
4
5
6
7
8
9
10
11
12
13
14
15
16
17
18
#if STAGE
#warning "STAGE"
jsCodeLocation = [[NSBundle mainBundle] URLForResource:@"main" withExtension:@"jsbundle"];
#elif DEBUG
#if TARGET_OS_SIMULATOR
#warning "DEBUG SIMULATOR"
jsCodeLocation = [NSURL URLWithString:@"http://localhost:8081/index.ios.bundle?platform=ios&dev=true"];
#else
#warning "DEBUG DEVICE"
NSString *serverIP = [[NSBundle mainBundle] objectForInfoDictionaryKey:@"SERVER_IP"];
NSString *jsCodeUrlString = [NSString stringWithFormat:@"http://%@:8081/index.ios.bundle?platform=ios&dev=true", serverIP];
NSString *jsBundleUrlString = [jsCodeUrlString stringByAddingPercentEscapesUsingEncoding:NSUTF8StringEncoding];
jsCodeLocation = [NSURL URLWithString:jsBundleUrlString];
#endif
#else
#warning "PRODUCTION DEVICE"
jsCodeLocation = [[NSBundle mainBundle] URLForResource:@"main" withExtension:@"jsbundle"];
#endif

为了能够同时安装多个应用,还需要设置各个模式下的 Bundle Identifier。进入 Build Settings -> Packaging -> Product Bundle Identifier
Xcode-bundleID

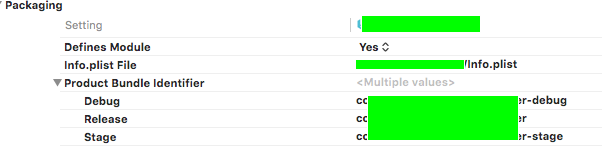
为了便于区分,最好给各个模式下的应用设置不同的AppName。进入 Build Settings -> User-Defined,添加一项设置
Xcode-User-Defined

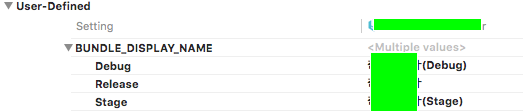
然后再进入 Info,设置 CFBundleDisplayName 的值为 $(BUNDLE_DISPLAY_NAME)

至此,配置已经修改完成。如果之前有使用 cocoapods 安装过第三方库的话,那么可能还需要再重新安装一遍。