ReactNative获取设备屏幕尺寸

在做移动开发过程中,有时我们需要适配不同尺寸大小的屏幕。这里我们就需要到获取设备屏幕的大小。
由于我们是使用的 ReactNative 来开发手机 app,这里就介绍一下在 ReactNative 中如何获取到设备屏幕的分辨率的。
也算是对之前踩坑的总结吧。

在此之前需要先了解 ReactNative 中的尺寸计算单位,它并不是使用的px。http://facebook.github.io/react-native/releases/next/docs/pixelratio.html

使用 Dimensions 模块

在 ReactNative 中有一个 Dimensions 模块,通过它可以获取当前设备的屏幕分辨率。
参考: http://facebook.github.io/react-native/releases/next/docs/dimensions.html

1
var {height, width} = Dimensions.get('window');

刚开始时我也是使用这种方法来得到整个屏幕的分辨率的,感觉轻松搞定。然而这里面却有一个坑。

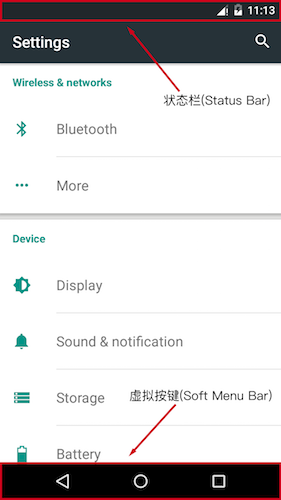
首先来看看 ios 和 android 中的界面结构:

ios-screen-struct
android-screen-struct

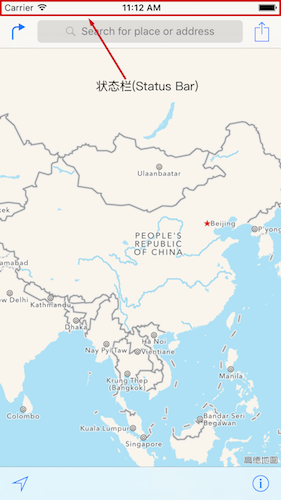
如图所示,屏幕的宽度计算比较简单,就是从左边到右边的距离即可。
然后就是屏幕的高度了,这里其实我们是需要获取到可用区域的高度。
如图所示,对于 ios 系统来说可用区域高度就是整个屏幕的高度减去 Status Bar 的高度;
对于 android 系统来说就是屏幕的高度减去 Status Bar 和 Soft Menu Bar 的高度。

获取 iOS 设备的屏幕分辨率

正如上面所说的,在 ios 下的计算方法为:

1
2
var WIDTH = Dimensions.get('window').width;
var HEIGHT = Dimensions.get('window').height - STATUS_BAR_HEIGHT;

在 ios 系统状态栏高度(STATUS_BAR_HEIGHT)通常为 20。
不过如果你设置了隐藏状态栏的话,那么 STATUS_BAR_HEIGHT 则为0。

以上是手机竖屏的情况,在横屏状态下则交换两个值:

1
2
var LANDSCAPE_WIDTH = HEIGHT + STATUS_BAR_HEIGHT;
var LANDSCAPE_HEIGHT = WIDTH - STATUS_BAR_HEIGHT;

到了这里虽然麻烦了一点,但是总体来说也还好。问题都解决了。
感觉生活是如此美好啊,然而这个世界上却还有一个系统名为 android。
它有着数不清种类屏幕大小的设备,然后瞬间感觉整个人都不好了。

获取 Android 设备的屏幕分辨率

如果按照 ios 下的方法来做,获取到 WIDTH 是没有问题,
但是 HEIGHT 的话还需要减去 Status Bar 和 Soft Menu Bar 的高度。
因此我们还需要获取到状态栏的高度(STATUS_BAR_HEIGHT)和虚拟按钮的高度(SOFT_MENU_BAR_HEIGHT)。

这里我们使用react-native-extra-dimensions-android这个库。

1
2
3
4
5
6
const ExtraDimensions = require('react-native-extra-dimensions-android');

const STATUS_BAR_HEIGHT = ExtraDimensions.get('STATUS_BAR_HEIGHT');
const SOFT_MENU_BAR_HEIGHT = ExtraDimensions.get('SOFT_MENU_BAR_HEIGHT');
const WIDTH = ExtraDimensions.get('REAL_WINDOW_WIDTH');
const HEIGHT = ExtraDimensions.get('REAL_WINDOW_HEIGHT') - STATUS_BAR_HEIGHT - SOFT_MENU_BAR_HEIGHT;

以上是设备竖屏的结果,在横屏下你以为是不是只需要交换两个值就搞定了呢。

1
2
var LANDSCAPE_WIDTH = HEIGHT + STATUS_BAR_HEIGHT;
var LANDSCAPE_HEIGHT = WIDTH - STATUS_BAR_HEIGHT;

Naive!!如果这么轻松就搞定了的话,android就不叫做android了。

先来看看下面两张图片吧,分别是一个android平板设备在横屏和竖屏状态下的截图:

android-pad-landscape
android-pad-portrait

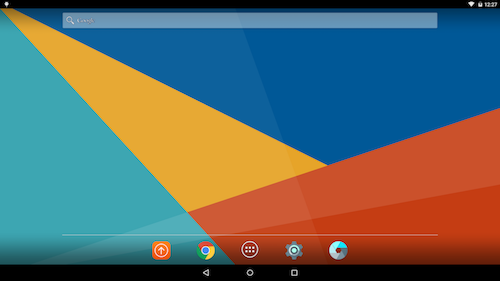
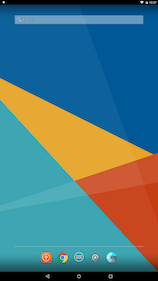
你把你手中的 android 手机分别进入横屏和竖屏状态下,再对照上面两张图片你会发现什么。
没错的,在平板设备上屏幕旋转之后 Soft Menu Bar 也跟着旋转了,
而在手机设备上 Soft Menu Bar 是始终固定在手机底部的。

尼玛,太坑爹了。看到这里瞬间呕血三升,要适配手机跟平板实现是太麻烦了。
以下是我的解决办法,先检查当前设备是否为平板,然后再分别处理。
至于平板的判断方法就自己想办法了,我的方法也不一定准。

1
2
3
4
5
6
7
if (isPad) {
LANDSCAPE_WIDTH = HEIGHT + STATUS_BAR_HEIGHT + SOFT_MENU_BAR_HEIGHT;
LANDSCAPE_HEIGHT = WIDTH - STATUS_BAR_HEIGHT - SOFT_MENU_BAR_HEIGHT;
} else {
LANDSCAPE_WIDTH = HEIGHT + STATUS_BAR_HEIGHT;
LANDSCAPE_HEIGHT = WIDTH - STATUS_BAR_HEIGHT;
}

以上是在 android 下遇到的第一个大坑。

到了这里我以为一切都该结束了吧,然而没想到还有一种手机叫做魅族。如下图:

Mezu-smart-bar

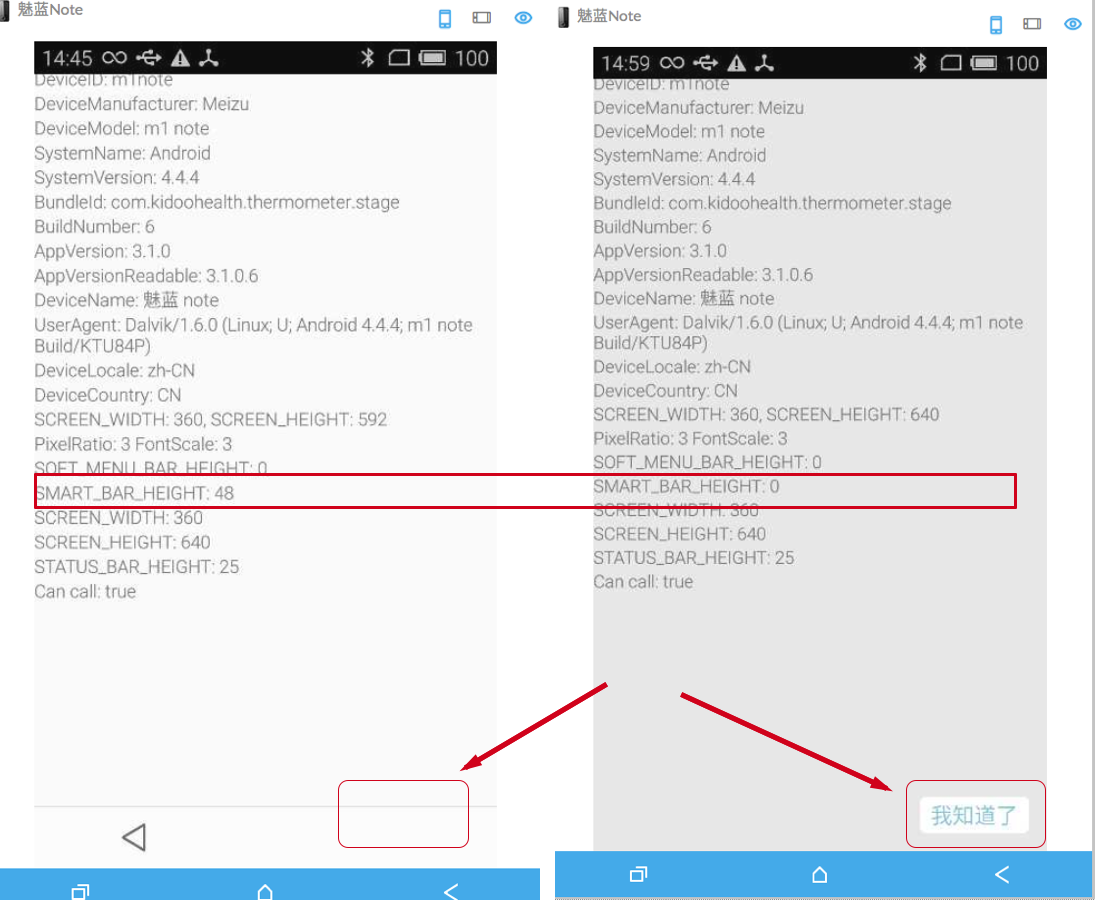
在屏幕右下角其实是有一个按钮的,然而左图所示的,该按钮被魅族手机的 Smart Bar 遮住了。
进入系统设置将 Smart Bar 隐藏后效果如右图所示。

看到这里又吐了两口老血,此为第二个大坑。

1
2
3
4
5
6
7
8
9
10
11
12
13
const SMART_BAR_HEIGHT = ExtraDimensions.get('SMART_BAR_HEIGHT');

if (SMART_BAR_HEIGHT) {
HEIGHT -= SMART_BAR_HEIGHT;
}

....
// 在上面 LANDSCAPE 的计算结果上再作如下处理

if (SMART_BAR_HEIGHT) {
LANDSCAPE_WIDTH += SMART_BAR_HEIGHT;
LANDSCAPE_HEIGHT -= SMART_BAR_HEIGHT;
}

在魅族的手机上计算屏幕高度时还需要再减去 Smart Bar 的高度,
同时还需要注意的是, Smart Bar 跟平板上的Soft Menu Bar 一样会随着屏幕旋转而转动的。

最后还有一点需要注意的是,在安装 react-native-extra-dimensions-android 库时不能直接使用 npm install --save react-native-extra-dimensions-android 进行安装,
而是需要直接通过 git 仓库来安装: npm install --save git+https://github.com/jaysoo/react-native-extra-dimensions-android.git

因为在 npm 上 react-native-extra-dimensions-android 的最新版为 0.17.0,
SMART_BAR_HEIGHT 的功能是在此之后才添加进来的。

在库的版本上面又被坑了一下。

ReactNative jsbundle管理

上一篇文章中介绍了 RN(ReactNative) 自动设置 development server IP 的方法。
这在开发过程中方便了不少,然而我在想能否更加方便一些呢。首先我们知道在开发 RN 应用时,jsbundle 有两种加载方式。
第一种是指定 url 通过网络进行加载;第二种是 pre-bundled 将 jsbundle 文件打包进 app 安装包中。
编译生成的安装包有 Debug 和 Release 两种模式,在 Debug 模式下默认是使用第一种方式加载 jsbundle,在 Release 模式下默认是使用第二种方式。

现在我的需求是编译生成三种模式的安装包:Debug、Release 和 Stage。前两种跟之前一样,
而 Stage 模式下是使用第二种方式加载 jsbundle, 但是生成的 jsbundle 是 DEV 状态下的。
这样在开发过程中给他人安装app进行测试时就不需要反复的修改配置了。

修改 Android 的配置

对于的 android 的配置比较简单。只需修改 android/app/build.gradle 文件,新添加一个 buildTypes 即可。

apply from: "react.gradle" 之前添加如下内容:

1
2
3
4
project.ext.react = [
bundleInStage: true
]

然后再修改配置如下:

1
2
3
4
5
6
7
8
9
10
11
12
13
14
15
16
17
18
19
20
android {
buildTypes {
debug {
applicationIdSuffix ".debug"
resValue 'string', 'app_name', '"XXXX(Debug)"'
......
}
release {
minifyEnabled enableProguardInReleaseBuilds
proguardFiles getDefaultProguardFile("proguard-android.txt"), "proguard-rules.pro"
resValue 'string', 'app_name', '"XXXX"'
......
}
stage {
initWith(buildTypes.debug)
applicationIdSuffix ".stage"
resValue 'string', 'app_name', '"XXXX(Stage)"'
}
}
}

这里添加了一个 stage buildTypes 继承至 debug。并且为了能够同时安装不同模式下的app,这里设置了不同模式 bundleID 的后缀。
同时还设置了不同模式下app的名称,以便区分。

然后进行 android 目录下执行 ./gradlew assemble 命令,即可在 android/app/build/outputs/apk 目录生成 app-debug.apk、app-release.apk 和 app-stage.apk 三个 apk 包。

修改 iOS 的配置

首先将 Debug Configuration 复制为 Stage
Xcode-configuration

然后进入 Build Settings 修改 Preprocessor Macros,对 Stage 添加一项配置: STAGE=1
Xcode-buildSettings

然后再编辑 AppDelegate.m 文件,修改 jsCodeLocation 相关配置。

1
2
3
4
5
6
7
8
9
10
11
12
13
14
15
16
17
18
#if STAGE
#warning "STAGE"
jsCodeLocation = [[NSBundle mainBundle] URLForResource:@"main" withExtension:@"jsbundle"];
#elif DEBUG
#if TARGET_OS_SIMULATOR
#warning "DEBUG SIMULATOR"
jsCodeLocation = [NSURL URLWithString:@"http://localhost:8081/index.ios.bundle?platform=ios&dev=true"];
#else
#warning "DEBUG DEVICE"
NSString *serverIP = [[NSBundle mainBundle] objectForInfoDictionaryKey:@"SERVER_IP"];
NSString *jsCodeUrlString = [NSString stringWithFormat:@"http://%@:8081/index.ios.bundle?platform=ios&dev=true", serverIP];
NSString *jsBundleUrlString = [jsCodeUrlString stringByAddingPercentEscapesUsingEncoding:NSUTF8StringEncoding];
jsCodeLocation = [NSURL URLWithString:jsBundleUrlString];
#endif
#else
#warning "PRODUCTION DEVICE"
jsCodeLocation = [[NSBundle mainBundle] URLForResource:@"main" withExtension:@"jsbundle"];
#endif

为了能够同时安装多个应用,还需要设置各个模式下的 Bundle Identifier。进入 Build Settings -> Packaging -> Product Bundle Identifier
Xcode-bundleID

为了便于区分,最好给各个模式下的应用设置不同的AppName。进入 Build Settings -> User-Defined,添加一项设置
Xcode-User-Defined

然后再进入 Info,设置 CFBundleDisplayName 的值为 $(BUNDLE_DISPLAY_NAME)

至此,配置已经修改完成。如果之前有使用 cocoapods 安装过第三方库的话,那么可能还需要再重新安装一遍。

ReactNative自动设置开发服务器IP

在开发 ReactNative 应用时,jsbundle 有两种加载方式。第一种是指定 url 通过网络进行加载;第二种是 pre-bundled 将 jsbundle 文件打包进 app 安装包中。

以下就是创建项目之后 ios 的默认配置。

1
2
3
4
5
6
7
8
9
10
11
12
13
14
15
16
17
18
19
20
21
22
23
24
25
  /**
* Loading JavaScript code - uncomment the one you want.
*
* OPTION 1
* Load from development server. Start the server from the repository root:
*
* $ npm start
*
* To run on device, change `localhost` to the IP address of your computer
* (you can get this by typing `ifconfig` into the terminal and selecting the
* `inet` value under `en0:`) and make sure your computer and iOS device are
* on the same Wi-Fi network.
*/

jsCodeLocation = [NSURL URLWithString:@"http://localhost:8081/index.ios.bundle?platform=ios&dev=true"];

/**
* OPTION 2
* Load from pre-bundled file on disk. The static bundle is automatically
* generated by the "Bundle React Native code and images" build step when
* running the project on an actual device or running the project on the
* simulator in the "Release" build configuration.
*/

// jsCodeLocation = [[NSBundle mainBundle] URLForResource:@"main" withExtension:@"jsbundle"];

这里有个麻烦的地方就是,当我在真机设备上调试时。每次都需要执行 ifconfig 命令,然后将 localhost 修改为我的 ip 地址。并且在使用 git 进行代码管理时,一不小心将修改后的文件提交上去了,其他同事在 pull 时又会与自己的冲突。
最终实在忍受不了了,在想能不能编译时自动获取到本机的 ip 呢,这样就不用每次都手动修改了。于是找到了这篇文章: http://moduscreate.com/automated-ip-configuration-for-react-native-development/
我这里参考了他的方案并做了一点小调整。

按照他的步骤,首先添加 Run Script。
在 Xcode 中选择“Build Phases”,然后点击左上角的”+”选择“New Run Script Phase”。
在列表最后出现了“Run Script”,将其展开,然后编辑代码块的内容:

1
2
3
4
5
6
INFOPLIST="${TARGET_BUILD_DIR}/${INFOPLIST_PATH}"
echo "writing to $INFOPLIST"
PLISTCMD="Add :SERVER_IP string $(ifconfig | grep inet\ | tail -1 | cut -d " " -f 2)"
echo -n "$INFOPLIST" | xargs -0 /usr/libexec/PlistBuddy -c "$PLISTCMD" || true
PLISTCMD="Set :SERVER_IP $(ifconfig | grep inet\ | tail -1 | cut -d " " -f 2)"
echo -n "$INFOPLIST" | xargs -0 /usr/libexec/PlistBuddy -c "$PLISTCMD" || true

第二步编辑 AppDelegate.m 文件。
将项目默认生成的 jsCodeLocation 配置删除掉,并添加代码:

1
2
3
4
5
6
7
8
9
10
11
12
13
14
15
#if DEBUG
#if TARGET_OS_SIMULATOR
#warning "DEBUG SIMULATOR"
jsCodeLocation = [NSURL URLWithString:@"http://localhost:8081/index.ios.bundle?platform=ios&dev=true"];
#else
#warning "DEBUG DEVICE"
NSString *serverIP = [[NSBundle mainBundle] objectForInfoDictionaryKey:@"SERVER_IP"];
NSString *jsCodeUrlString = [NSString stringWithFormat:@"http://%@:8081/index.ios.bundle?platform=ios&dev=true", serverIP];
NSString *jsBundleUrlString = [jsCodeUrlString stringByAddingPercentEscapesUsingEncoding:NSUTF8StringEncoding];
jsCodeLocation = [NSURL URLWithString:jsBundleUrlString];
#endif
#else
#warning "PRODUCTION DEVICE"
jsCodeLocation = [[NSBundle mainBundle] URLForResource:@"main" withExtension:@"jsbundle"];
#endif

这里如果在模拟器中进行调试,那么 development server 则为 localhost;如果在真机设备中调试,那么 development server 则为电脑的 ip 地址。
到此已经可以实现自动设置 ip 地址了,如果还想要在 Chrome 中对设备进行调试,那么还需要修改一下 WebSocket 的配置。

第三步编辑 RCTWebSocketExecutor.m 文件。
在 Xcode 中打开 -> Libraries -> RCTWebSocket.xcodeproj -> RCTWebSocketExecutor.m 文件,大概在文件 53 行左右的位置,将 NSString *URLString = [NSString stringWithFormat:@"http://localhost:%zd/debugger-proxy?role=client", port]; 修改为:

1
2
3
4
5
6
#if TARGET_OS_SIMULATOR
NSString *serverIP = @"localhost";
#else
NSString *serverIP = [[NSBundle mainBundle] objectForInfoDictionaryKey:@"SERVER_IP"];
#endif
NSString *URLString = [NSString stringWithFormat:@"http://%@:%zd/debugger-proxy?role=client", serverIP, port];

现在配置已经完成了,接下来就试试看是否有效吧。

经过修改之后相对于之前已经方便了不少,只是我还遇到一个问题。那就是我的 MacBook 在办公室时的 ip 跟在家里的 ip 是不同的。
这样的话每次切换环境都需要重新编译一下应用,还是有点麻烦。于是乎我自己将第一步的脚本作了下修改,新的内容如下:

1
2
3
4
5
6
INFOPLIST="${TARGET_BUILD_DIR}/${INFOPLIST_PATH}"
echo "writing to $INFOPLIST"
PLISTCMD="Add :SERVER_IP string $(hostname)"
echo -n "$INFOPLIST" | xargs -0 /usr/libexec/PlistBuddy -c "$PLISTCMD" || true
PLISTCMD="Set :SERVER_IP $(hostname)"
echo -n "$INFOPLIST" | xargs -0 /usr/libexec/PlistBuddy -c "$PLISTCMD" || true

这里我使用 hostname 来作为 development server 的地址,而不是 ip。这样的话即便是网络环境发生了变化,只要手机设备跟电脑处于同一个局域网内就不需要再重新编译应用了。

Mac OS中VirtualBox的Android蓝牙设置

在做手机开发时,由于没有 Android 设备,只得在模拟器中进行测试。然而在模拟器却没法访问本机的蓝牙设备,这对于要做蓝牙开发来说很不方便。

经过各种搜索终于找到了一个解决方案。首先需要以下工具:

1.禁用系统的蓝牙服务:

1
2
3
4
5
6
7
$ sudo launchctl unload /System/Library/LaunchDaemons/com.apple.blued.plist
# 对于 Mountain Lion 系统执行如下命令:
$ sudo kextunload -b com.apple.iokit.IOBluetoothSerialManager
$ sudo kextunload -b com.apple.iokit.BroadcomBluetoothHCIControllerUSBTransport
# 对于 Snow Leopard 系统执行如下命令:
$ sudo kextunload -b com.apple.driver.BroadcomUSBBluetoothHCIController
$ sudo kextunload -b com.apple.driver.AppleUSBBluetoothHCIController

2.运行 VirtualBox

设置启用 USB 控制器,添加蓝牙设备,如图:

然后运行 android 系统即可。

3.在退出 VirtualBox 之后,重新启用系统的蓝牙服务:

1
2
3
4
5
6
7
$ sudo launchctl load /System/Library/LaunchDaemons/com.apple.blued.plist
# 对于 Mountain Lion 系统执行如下命令:
$ sudo kextload -b com.apple.iokit.IOBluetoothSerialManager
$ sudo kextload -b com.apple.iokit.BroadcomBluetoothHCIControllerUSBTransport
# 对于 Snow Leopard 系统执行如下命令:
$ sudo kextload -b com.apple.driver.BroadcomUSBBluetoothHCIController
$ sudo kextload -b com.apple.driver.AppleUSBBluetoothHCIController

参考:
https://www.virtualbox.org/ticket/2372#comment:17

gulp+browserSync配置

Browsersync 是一个前端调试的利器,它能够让你在页面文件改动之后自动刷新浏览器,从而方便了前端的调试工作。

本文就是对于 Browsersync + Gulp 的配置作个简单的笔记。

  1. 首先安装 Browsersync 与 Gulp:
1
$ npm install browser-sync gulp --save-dev
  1. gulpfile.js 中创建新任务:
1
2
3
4
5
6
7
8
9
10
11
12
13
14
15
16
var gulp = require('gulp');
var browserSync = require('browser-sync').create();

var config = {
baseDir: 'src',
watchFiles: [ 'src/**/*.html', 'src/assets/css/*.css', 'src/assets/js/*.js' ]
}

gulp.task('serve', function() {
browserSync.init({
files: config.watchFiles,
server: {
baseDir: config.baseDir
}
});
})

这里表示以 src 目录作为根目录启动 HTTP 服务,并监听 src 目录下的所有 htmlcss 以及 js 类型的文件,当这些文件有改动时 Browsersync 会自动刷新浏览器页面。

如果想配合使用 SASS 之类的,可以参考: https://www.browsersync.io/docs/gulp/

同时为了避免之后每次都要重新配置一遍,于是我自己写了个简单的 yo 生成器: https://github.com/wusuopu/my-yeoman-generator

由于这只是我自己 generator,并没有发布到 npm 上,因此只能手动进行安装。各位有兴趣的可以试试。使用方法:

  1. 安装 yo 和 bower: $ npm install -g yo bower

  2. 安装 generator:

1
2
3
$ git clone https://github.com/wusuopu/my-yeoman-generator generator-wusuopu
$ cd generator-wusuopu
$ npm link
  1. 生成项目:
1
2
3
$ mkdir webpage
$ cd webpage
$ yo wusuopu:bootstrap3

这里 bootstrap3 generator 包含了 bootstrap3、font-awesome、jquery 这些常用的前端库,省得每次都需要重新下载一遍。

HTTP Access Control跨域请求

最近在使用 Ajax api 请求时遇到了跨域的问题,现在问题解决了顺便做个笔记。

场景:现在主站域名为 example.org ,需要通过 ajax 请求 hello-world.example 上的资源。

Access-Control-Allow-Origin

如果请求时遇到如下错误:
No 'Access-Control-Allow-Origin' header is present on the requested resource. Origin 'http://example.org' is therefore not allowed access.

则需要在 hello-world.example 的 server 端 Response Headers 中设置 Access-Control-Allow-Origin 字段。其值根据情况设置为 http://example.org 或者 https://example.org

Access-Control-Allow-Methods

一般情况下只允许 GET 和 POST 请求,对于 RESTful 的 api 可能会有其他类型的请求。例如:

1
2
3
4
5
$.ajax({
url: 'http://hello-world.example/sessions/me.json',
method: 'DELETE',
dataType: 'json'
});

这时如果出现方法不被允许,则需要在 server 端 Response Headers 中设置 Access-Control-Allow-Methods 字段。如: Access-Control-Allow-Methods: GET, POST, DELETE

Access-Control-Allow-Credentials

当在 hello-world.example 站点登录之后,浏览器会保存对应的 Cookies ,但是在 example.org 站点中使用 ajax 时发现 hello-world.example 的 Cookies 并没有附加到 Request Headers 中。

此时就需要设置 XMLHttpRequest 的 withCredentials 属性,例如:

1
2
3
4
5
6
7
8
$.ajax({
url: 'http://hello-world.example/session/me.json',
method: 'GET',
dataType: 'json',
xhrFields: {
withCredentials: true
}
});

同时在 server 端 Response Headers 中设置 Access-Control-Allow-Credentials 字段。说明允许通过跨域修改 Cookies 。如: Access-Control-Allow-Credentials: true

以上是常用的几个字段,更多设置参考手册: https://www.w3.org/TR/access-control/

Xcode文档离线安装

在 Xcode 中下载安装文档速度太慢了,不得已只得自行下载,然后再手动安装。

  1. 首先在 https://developer.apple.com/library/downloads/docset-index.dvtdownloadableindex 找到需要下载的文档的下载地址。

这里我需要下载的是 iOS 9.2 的文档,内容如下:

1
2
3
4
5
6
7
8
9
10
11
12
13
14
15
16
17
18
19
20
21
22
23
24
25
26
27
28
29
30
31
32
33
34
<!-- START iOS doc set -->
<dict>
<key>fileSize</key>
<integer>1071665431</integer>
<key>identifier</key>
<string>com.apple.adc.documentation.iOS</string>
<key>name</key>
<string>iOS 9.2 Documentation</string>
<key>source</key>
<string>https://devimages.apple.com.edgekey.net/docsets/20151208/031-43202-A.dmg</string>
<key>userInfo</key>
<dict>
<key>ActivationPredicate</key>
<string>$XCODE_VERSION &gt;= '7.2'</string>
<key>Category</key>
<string>Documentation</string>
<key>IconType</key>
<string>IDEDownloadablesTypeDocSet</string>
<key>InstallPrefix</key>
<string>$(HOME)/Library/Developer/Shared/Documentation/DocSets</string>
<key>InstalledIfAllReceiptsArePresentOrNewer</key>
<dict>
<key>com.apple.pkg.7.0.iOSDocset</key>
<string>10.9.0.0.1.1449203766</string>
</dict>
<key>RequiresADCAuthentication</key>
<false/>
<key>Summary</key>
<string>My description of content</string>
</dict>
<key>version</key>
<string>92.7</string>
</dict>
<!-- END iOS doc set -->

下载地址为: https://devimages.apple.com.edgekey.net/docsets/20151208/031-43202-A.dmg

如果觉得官网下载速度太慢了,也可以从我的百度网盘下载: http://pan.baidu.com/s/1pKsmkY3 。下载完成之后自行进行文件合并、md5校验。

  1. 将下载的 dmg 文件移动到 ~/Library/Caches/com.apple.dt.Xcode/Downloads/ 目录下(如果目录不存在,自行创建),
    并重命名为 <identifier>-<version>.dmg 这样的形式,在这里为: com.apple.adc.documentation.iOS-92.7.dmg

然后转到文档所在目录: ~/Library/Developer/Shared/Documentation/DocSets,如果对应的文档文件已存在则删除。
rm -rf com.apple.adc.documentation.iOS.docset

  1. 打开 Xcode ,点击下载对应的文档。此时应该会跳过下载步骤而直接进行安装。

Xcode

javascript使用async进行流程控制

前言

突然发现博客好久没有更新了,主要是因为最近这几个月比较忙。之前由 Python 转向了 Ruby,现在又由后端转向了前端。
这几个月接触的内容略有点多,信息量有点大,主要都是 js 相关的。准备之后抽时间将这些知识整理整理,沉淀沉淀。

Async

由于 js 是异步的,之前在使用 loopback 进行 server 端开发时,很容易就出现了比较深层次的回调嵌套。
async.js是 js 的一个工具,可以用来方便的控制 js 中的异步流程的,类似的库还有 Promise、RxJS 等。
最初它是设计用于 nodejs 的,不过在浏览器端也可以使用。

安装

安装方法很简单,直接使用 npm 即可: npm install async

使用方法

首先是加载 async 库,在 server 端使用 var async = require('async');
在浏览器端直接引用即可: <script type="text/javascript" src="async.js"></script>

async 提供一些集合操作方法和流程控制方法,我比较常用的是:eachmapserieswaterfall 这些方法。
其中 eachmap 方法与 lodash 的类似,可以用来遍历某个集合并执行一些操作。

each 方法定义如下:

1
async.each(collection, iterator, [callback])

该方法会对 collection 每个元素都调用 iterator 操作, iterator 函数原型为: iterator(item, callback)
collection 中的所有元素遍历完成或者执行 iterator 时发生错误就会调用 callback 回调,原型为: callback(err)

each 方法只是对每个元素进行操作,如果还需要获取操作的结果,那么可以使用 map 方法。定义如下:

1
async.map(collection, iterator, [callback])

mapeach 类似,只是 callback 定义为: callback(err, results)
resultsiterator 操作的结果集合。

如下是一个例子,一次读取多个文件的内容:

1
2
3
async.map(['file1','file2','file3'], fs.readFile, function(err, results){
// doSomething();
});

seriesmap 类似,不过 series 是遍历一个方法合集并挨个执行,然后返回结果:

1
async.series(tasks, [callback])

如:

1
2
3
4
5
6
7
8
9
10
11
async.series([
function fun1(callback){
callback(null, 'one');
},
function fun2(callback){
callback(null, 'two');
}
],
function(err, results){
// doSomething();
});

注意,以上这些方法各个任务的完成时间顺序是不确定的。如果有一些操作是需要按照先后顺序执行,可以使用 waterfall

1
async.waterfall(tasks, [callback])

例如在 loopback 的一个 controller 中,提供修改用户密码的功能。原始写法如下:

1
2
3
4
5
6
7
8
9
10
router.post('/user/password', function(req, res) {
User.findById(req.body.id, function(err, user){
if (err) doSomething();
user.password = req.body.password;
user.save(function(err){
if (err) doSomething();
res.status(200).end();
});
});
});

上面的例子功能还比较简单,回调层级不是很深。不过如果使用 waterfall 来控制就更为简单:

1
2
3
4
5
6
7
8
9
10
11
12
13
14
router.post('/user/password', function(req, res) {
async.waterfall([
function(callback){
User.findById(req.body.id, callback);
},
function(user, callback){
user.password = req.body.password;
user.save(callback);
}
], function(err){
if (err) doSomething();
res.status(200).end();
});
});

AngularJS学习笔记7——与rails整合

要在 rails 中使用 angular 直接在页面中引入进行即可,这个倒是不难。
只是在开发过程中突然发现了一个问题,就是 angular 的模板应该如何组织呢。
如果全写成内联模板这个不太好维护,如果是写成单个文件放在 public 目录下也不太妥。
不过好在这个问题已经有人解决了,有 angular-rails-templates 这么一个库:https://github.com/pitr/angular-rails-templates

首先安装该库:gem 'angular-rails-templates'

然后创建目录 app/assets/javascripts/templates
并在 app/assets/javascripts/application.js 中加载对应的文件:

1
2
//= require angular-rails-templates
//= require_tree ./templates

该目录下的模板文件命名与 rails 的视图命名类似,如: foo.htmlfoo.html.erbfoo.html.haml,foo.html.slim

可以参考我的一个例子: https://github.com/wusuopu/rails-billing

这里我是使用 bower 进行安装 angular 的库,首先安装 gem 'bower-rails'

然后初始化 bower_rails: rails g bower_rails:initialize
编辑 Bowerfile,添加所需要的依赖包:

1
2
3
4
5
6
7
8
9
10
11
asset 'angular'
asset 'angular-route'
asset 'angular-resource'
asset 'angular-mocks'
asset 'angular-flash'
asset 'angular-loading-bar'
asset 'angular-flash-messages'
asset 'angular-translate'
asset 'angular-bootstrap'
asset 'bootstrap-sass-official'
asset 'components-font-awesome'

再执行命令: rake bower:install 进行安装。

接着编辑 config/initializers/assets.rb 添加配置: Rails.application.config.assets.paths << Rails.root.join("vendor","assets","bower_components")

最后加载依赖文件 app/assets/javascripts/application.js

1
2
3
4
5
6
7
8
9
//= require angular/angular
//= require angular-route/angular-route
//= require angular-resource/angular-resource
//= require angular-flash-messages/angular-flash
//= require angular-loading-bar/build/loading-bar
//= require angular-translate/angular-translate
//= require angular-bootstrap/ui-bootstrap-tpls
//= require angular-rails-templates
//= require_tree ./templates

AngularJS学习笔记6——与jQuery、Bootstrap结合

jQuery

如果想要在 angular 内部调用 jQuery 的函数(如 jQuery 的 ajax 功能)比较简单,直接调用 $.ajax 即可。
但是如果想要在 angular 外部调用其函数就稍微麻烦一点,毕竟这也与 angular 的设计理念不符。

1
2
3
4
5
6
7
8
9
<div ng-controller="PageController">
...
</div>

<script>
var appModule = angular.module('myApp', []);
appModule.controller('PageController', ['$scope', '$http', function($scope, $http){
...
}]);

例如上个这段代码,如果想要从外部访问 PageController 中的某些内容。则可以先获取 PageController 的上下文对象($scope):angular.element($('[ng-controller="PageController"]')).scope();
在外部修改了 scope 的某些值时会发现对应的视图并没有更新,这时还需要调用 scope$digest 方法进行同步,或者直接调用 $apply 方法进行操作。

Bootstrap

之前使用 angularjs 时遇到了 Bootstrap 的控件不能正常使用了,如 dropdown 组件点击了没有效果。
经过分析发现是 angularjs 将 Bootstrap 的组件的事件给截获了。

好在有 angular-bootstrap 这么一个组件可以将它们整合在一起。

http://angular-ui.github.io/bootstrap/